|
|

| AN ONGOING NEWSLETTER | May 2013 |
Old West Building Tutorial 3: The Floor and First Assembly
by Gisby
| The Front | The Side Walls | The Floor | The Back Wall | Finishing the Building | Pack's Emporium |
I will assume that you've read the first two articles, so I will not repeat my comments on wood, colour-coding etc.
At this point, we have a building front, and two matching sides, right and left. If you have two sides the same.... Go back one page.
Please read the instructions through before starting, (duh) both so you can understand what I'm doing, and so that you can see any areas where you can do it better.
| STEP 1: Make a Floor
Take a bunch of popsicle sticks, and glue them edge to edge to make a sheet, as wide as the building front and as long as the walls. (In this case, 4 inches by six.) Make it slightly oversze, we'll be trimming it later. You can scribe or cut a line down the centre of each stick, making them look like two narrower boards. Do this before gluing them together. Put the floor under a pile of books to dry. You really do want it flat. You can choose instead to cut the floor from MDF, the back of an old clipboard, etc. But this is easier. |

|
| STEP 2: First stage assembly
Glue the sides to the front, making a 'U' shape. You will find it easier to glue one side at a time, letting the first dry before attaching the second. The walls are attached to the BACK of the front piece, flush with the outer edge. |

|
|
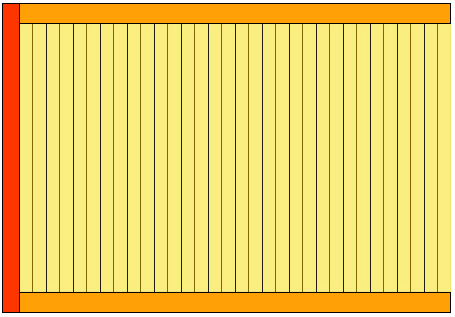
This is the assembly as seen from above: The red is the front piece, the side walls are orange. The side walls are actually thinner than the front, this is just to show the position of the pieces. Let them dry overnight. (The floor is drying overnight anyway.) You can place objects within the walls to keep them paralell. If they aren't perfect, the floor and back will help fix it. But the closer to position that they are, the easier everything will be. |

|
| STEP 4: Trim the Floor
Measure the space between the walls at the base of the building front. Trim the floor to this width. Be certain that the front angles are square, you want a rectangle, not a paralellogram. Measure the length of the walls, and mark it on the floor. Draw a line between these points and trim the floor to this width. (If your walls are slightly off, the floor won't be square at the back.) The floor should now be the same size and shape as the interior of your building. |

|
| STEP 5: Insert the Floor
Glue the floor inside the building, at the base of the front & walls. Place a bunch of weights on the floor to keep it down while it dries. It should be flat on the table. Piles of books can hold the walls in place against the floor while it dries. You can also use tape or clamps... Whatever works.. Let it dry overnight. Now you have three walls and a floor. Next, we build the back wall...
|
|