Timothy earned |
![]()
|
|
| AN ONGOING NEWSLETTER | November 2012 |
|
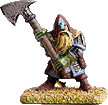
Everyone knows you can't have great looking miniatures without spending a fortune on them. But I love wargaming and want to have beautiful miniatures to wargame with. What to do? Endless hours of google searching the internet led to an article showing how a cartoony little miniature by eM-4 Miniatures could be turned into a terrifying legion of fully customized Orcs. You can find this amazing little number here and here and here and here.
I'm not a good painter, not a good converter, not good with any of the assorted hobby skills such as pinning, cleaning mold lines, any form of of green stuffing, or anything else remotely useful to a hobbyist. In spite of this I wound up with a great unit of beautiful looking minis that cost me 10 (ten) U.S. Dollars. Just to be absolutely clear, I am saying I have a great looking horde of Dwarves (50 and growing) based and ready for the most popular tabletop games out there, for 10 bucks. In honor of Mr. Gisby, whomever you are, I wanted to share my painting guide for the Em4 Plastic Dwarf Warrior with great ax. I want others to see that even if you have no talent like me, with a little time you too can have a great looking army at a great price. Step 1: Frist I trimmed the integral base to fit a 20mm base: I used a pair of tin-snips but a hobby saw, or hobby knife could work too. I glued the dwarf to a 20mm square of sheet magnet. This took no time at all. Once that was done I covered the base in PVA glue and sand. Once the glue had a moment to dry I shook it around to dislodge extra sand and sprayed the entire miniature black. Step 2: I painted everything that looked metal a silvery steel. This was the bottom layer so I was very fast and messy with this step. Step 3:
Use a small brush and be neat, take your time at first but this will speed up as you get the hang of it. Some models god all bronze helms to give the unit a little dynamic. Step 4: I painted the cloth armor liner on his shoulders blue, his canteen, blue, and his gloves dark red. I changed this up as I went to give the unit a common color but a little difference, so some figures have red armor liner and blue gloves, you should mix and match but make sure to keep to the same limited set of colors. |
Step 5: Now I painted the beard brown, again take your time on this, especially around the face. Step 6: This is a double step, first paint the base gray, using some water in the paint helps get it in the cracks and crevasses of the sand faster. Give it a moment to dry (around 10min) and then use a black or brown was on the sand to give it depth. Either use specialty washes you can buy or just mix your paint with a lot of water to and slap it on. Dont worry if it looks bad, it will get covered up later. Step 7: Mix water, PVA glue, and snow flocking together to great a milkshake of snow and slap some all over the base. Mixing can be tough to get the right consistency, and to be honest I never found a trick for it, just start adding the material and you will get it. Just get it to milkshake level.
Step 8: More washing, be careful not to drip wash on the snow. In hindsight maybe you should wash before you put on the snow...... Anyway I used a black wash (black paint mixed with mostly water, a lot more water then paint, or just buy the stuff, its really worth it.) Carefully slap blobs of it on all the silver metal and two lines of it on either side of the arrow on the helmet. It might look bad when putting it on but it dries nice. Then I used a brown wash for the beard. A better painter then I would surely do more, but I like the results now so I am done! If you look at them as a group you can see they have the same color scheme but on different places on each model.
Here is a full unit of 20 ready for battle. Next I plan on trying to make some of them into a standard bearer and a musician, just remember, if I can do it, you can certainly do it better so grab some plastic and get painting.
|
 Using a goldish bronze I painted the trim of his mail shirt, the arrow on his helm, his shield stub (why not), his back plates, and the trim around his canteen looking thing.
  This is also when I hit his face with a little skin tone. If you get some on the beard no big deal, but be careful with the helmet so you don't have to go back and touch it up later. Detail brush is key.

